
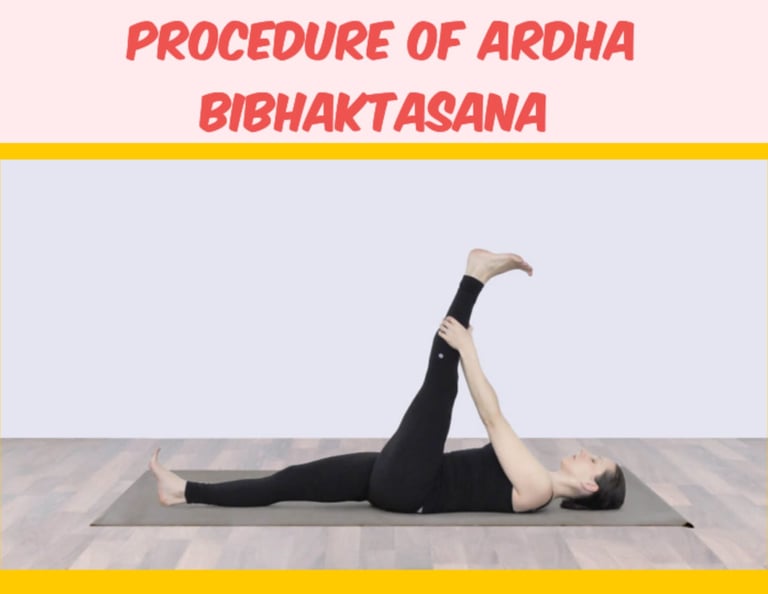
Procedure of Ardha Bibhaktasana
Ardha Bibhaktasana (Half-Reclined Hand-to-Big-Toe Posture) is a therapeutic yoga pose that basically extends the legs, hips, and spine whereas advancing adaptability, adjust, and unwinding. It is a generally basic but successful posture that can be altered for specialists of all levels. Underneath is a step-by-step direct to performing Ardha Bibhaktasana: Step-by-Step Procedure 1. Beginning Position – Lying on Your Back: Begin by lying flat on your back on a yoga mat. Guarantee that your body is in an unbiased position, with your arms resting by your sides and your legs amplified completely on the floor. Your feet ought to be around hip-width separated, and the palms of your hands ought to confront down, giving a steady base. 2. Lock in Your Core: Before moving into the posture, take a minute to lock in your center. Delicately draw your paunch button towards your spine to actuate the stomach muscles. This engagement will offer assistance ensure your lower back as you move into the stretch. 3. Expand One Leg Up: Inhale profoundly and, on the breath out, gradually amplify one leg upwards. Start by bringing your right leg toward the ceiling whereas keeping the cleared out leg level on the floor. The objective is to keep your right leg straight but dodge locking the knee. If you are incapable to keep your leg straight, you can twist your knee somewhat to keep up consolation and maintain a strategic distance from overstraining your muscles. 4. Snatch the Huge Toe: Using your right hand, get hold of your right huge toe. If you're incapable to reach your toe, you can utilize a yoga strap around the curve of your foot for help. The strap will permit you to hold the leg without over-stretching, giving back as you extend the extent. Then again, if you can’t reach your toe, essentially hold onto your lower leg, calf, or utilize a belt or strap for included support. 5. Adjust the Leg and Keep the Pelvis Stable: Once you have your foot or strap in hand, guarantee that your amplified leg is adjusted specifically over your hip. Dodge letting the leg float out to the side. At the same time, keep your pelvis grounded on the tangle, and dodge curving your lower back. This arrangement will guarantee that you are extending the hamstrings and not overextending the lower back. 6. Develop the Stretch: On an breath in, stretch your spine and reach the crown of your head towards the ceiling, stretching the whole body. As you breathe out, tenderly drag your amplified leg toward your confront, extending the extent in your hamstrings, calves, and hips. Guarantee that you are extending gradually and not constraining the development. If you involvement any distress or strain, discharge the pressure marginally and keep your breathing calm and steady. 7. Center on the Breathing: As you hold the position, keep up unfaltering, profound breaths. Breathe in profoundly through your nose, growing the chest and midriff, and breathe out gradually through your nose. Breathing profoundly amid the posture makes a difference to unwind the muscles and upgrades the adequacy of the extent. Center on letting go of pressure with each exhale. 8. Keep the Other Leg Active: While extending the expanded leg, keep the cleared out leg dynamic and locked in. Press the cleared out heel into the floor to keep up soundness in the pelvis and the lower back. This makes a difference you keep up adjust and diminishes any propensity for the pelvis to tilt. 9. Hold the Pose: Maintain the stretch for about 20-30 seconds, depending on your flexibility and comfort level. Ensure that your body remains relaxed and aligned throughout the stretch. If you feel any discomfort in the lower back, adjust your alignment to keep the spine neutral. 10. Release the Pose: To come out of the pose, slowly and mindfully release the grip on your toe (or the strap) and lower the right leg back down to the floor with control. Take a moment to rest in the starting position, with both legs extended and arms by your sides. Relax and breathe deeply. 11. Repeat on the Other Side: Once you have completed the stretch on one leg, repeat the same process on the other side. Ensure that the same alignment principles are followed for the left leg, maintaining an active core and neutral pelvis. Tips for Proper Alignment and Safety: Neutral Spine: Always maintain a neutral spine to avoid any strain on the lower back. The pelvis should remain grounded and stable on the floor, and you should avoid lifting your lower back or arching excessively. Avoid Overstretching: If you cannot reach your foot, do not force the stretch. Instead, use a strap to assist you in bringing the foot closer to your body, or simply hold your ankle or calf. Forcing the stretch can lead to injury, particularly in the hamstrings. Breath Awareness: Be mindful of your breathing throughout the pose. Deep, slow breaths help to relax the muscles and deepen the stretch. If you find yourself holding your breath, ease into the position more gently. Props: If you find it challenging to reach your foot, using a yoga strap or belt around the foot can provide assistance. The strap can be looped over the foot and held in both hands, allowing you to stretch without straining. Keep the Leg Straight but Not Locked: While aiming for a straight leg, avoid locking the knee. A slight bend in the knee is acceptable if it helps maintain comfort. Modify for Tight Hamstrings: If your hamstrings are tight, consider using a block under your head or shoulders to provide additional support and comfort as you stretch the leg. Conclusion: Ardha Bibhaktasana is a beneficial and accessible yoga pose that can be practiced by individuals of various skill levels. By focusing on alignment, breathing, and gradual stretching, practitioners can experience significant improvements in flexibility, core strength, and overall relaxation. Whether you are looking to alleviate lower back pain, increase hamstring flexibility, or simply unwind, Ardha Bibhaktasana is a valuable pose to incorporate into your yoga routine.
YOGA