
Procedure of Baddha Gomukhasana (Bound Cow Face Pose)
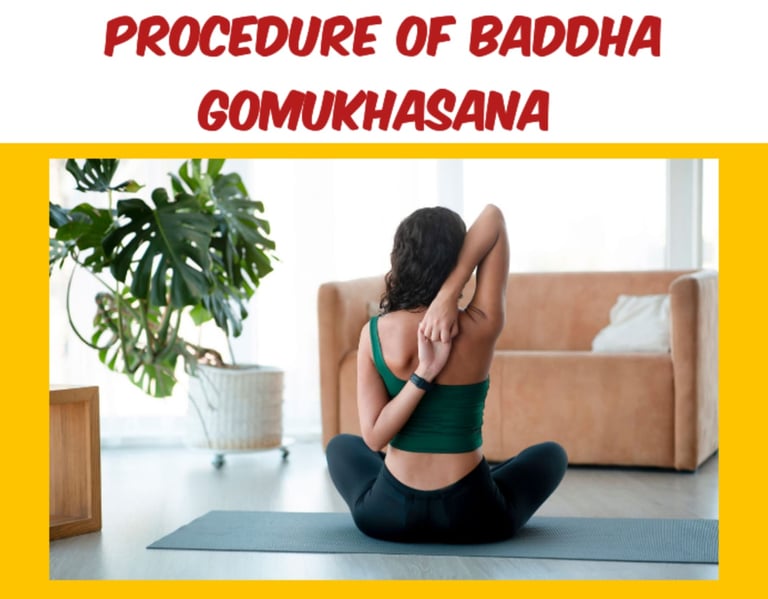
Baddha Gomukhasana, or Bound Cow Face Pose, is a seated yoga posture that requires flexibility, strength, and awareness. The pose provides a deep stretch to the hips, shoulders, and chest, and is often included in sequences to enhance posture and relieve tension. To achieve this posture correctly, it is important to follow a step-by-step procedure with mindful breathing to ensure proper alignment and avoid strain. Step-by-Step Procedure for Baddha Gomukhasana: 1. Preparation: Start by sitting on the floor in a comfortable seated position such as Sukhasana (Easy Pose) with your legs crossed, or in Dandasana (Staff Pose) with your legs extended forward. Sit up tall, ensuring your spine is straight and your body is relaxed. Ground your sit bones into the mat, drawing your shoulder blades down the back and lengthening your spine. 2. Position the Legs: i. Begin by bending your right knee and bringing your right foot to the outside of your left hip. Your right knee should point directly to the side and be positioned directly over your left thigh. ii. Next, bend your left knee and bring your left foot on top of your right thigh, stacking the left knee on top of the right. Both knees should be aligned in a way that they face forward or slightly to the side, while your feet remain close to your hips. iii. The goal is to have the legs in a cross-legged position, with the knees stacked on top of each other. Keep your spine straight and upright. 3. Place the Hands: Now, shift your attention to the arms: i. Raise your right arm overhead and bend the elbow, bringing your right hand down to the middle of your back, near the shoulder blade. ii. Reach your left arm behind your back and try to clasp your right hand with your left fingers. Ideally, your fingers will interlace, but if this is not possible due to shoulder or arm tightness, you can use a yoga strap or belt to loop around your hands and hold it. iii. Ensure that your shoulders are relaxed and not hunched. The goal is to open the chest and keep the elbows pointing upward as much as possible. 4. Align the Body: Focus on your posture: i. Keep your chest open and your spine tall. Avoid collapsing your chest forward or arching your back excessively. ii. The arms should be bound in a way that promotes a deep stretch in the shoulders, without forcing the arms into the bind. If you can’t reach your hands together, maintain the stretch and work toward it over time. iii. Your gaze should be forward, maintaining a neutral position of the head. Keep your chin parallel to the floor and avoid tensing your neck. 5. Breathe Deeply: Breathe deeply and steadily throughout the pose. Inhale through the nose, expanding the ribs and lungs, and exhale fully, releasing tension. Focus on lengthening your breath to help deepen the stretch and promote relaxation in the muscles. 6. Hold the Pose: Hold the pose for 30 seconds to 1 minute, depending on your flexibility and comfort level. Maintain a gentle stretch, but avoid forcing the body into the position. If you feel any discomfort or pain, especially in the shoulders or knees, back out of the pose slightly or take a break. 7. Release the Pose: To come out of the pose, gently release the hands from the bind and straighten your arms. Uncross your legs, and extend them forward in front of you to counterbalance the deep hip stretch. Sit quietly for a moment to absorb the effects of the posture, taking a few deep breaths. 8. Repeat on the Other Side: Now, repeat the same procedure on the other side, bringing the left leg over the right and binding the left arm behind the back. Be sure to maintain the same level of awareness and posture on both sides. Tips for Proper Alignment: i. Shoulders and Neck: Ensure that your shoulders are not hunched up towards your ears. Relax them down your back to open the chest and create more space in the shoulder joints. ii. Knee Position: If your knees don’t comfortably stack, place a cushion or blanket underneath your bottom knee for support. It’s more important to maintain comfort than to force the knee into an extreme position. iii. Breath Awareness: Breathe deeply into the chest to maximize the stretch across the shoulders and open the lungs. Focus on a smooth and even breath cycle. iv. Avoid Overstretching: If you can’t bind your hands together at first, don’t worry. With consistent practice, your flexibility will increase. Use a strap to help bridge the gap between your hands. Modifications: i. Using a Strap: If you can’t interlace your fingers, use a yoga strap or belt to loop around your hands and hold the strap with both arms. ii. Placing a Cushion Under the Hips: If you feel tension in the hips or lower back, place a cushion or blanket under your hips to elevate them slightly and help create a more comfortable angle for the knees. iii. Supported Variation: For beginners or those with knee or hip issues, perform a modified version of the pose with your legs in a less intense cross-legged position or sitting on a block for added support. Conclusion: Baddha Gomukhasana, when done correctly, is an excellent yoga pose that stretches the hips, shoulders, and chest while fostering mental clarity and focus. Practicing this pose regularly can enhance flexibility, improve posture, and reduce physical tension, leading to overall better health and well-being. Always approach the pose with mindfulness, honoring your body’s limits and gradually deepening the stretch over time.
YOGA