
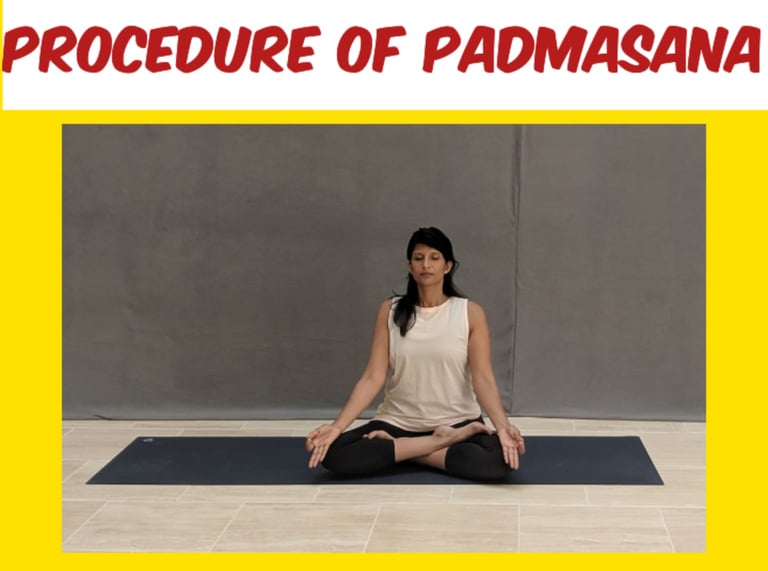
Procedure of Padmasana (Lotus Pose)
Padmasana, also known as the Lotus Pose, is a meditative posture that requires a combination of flexibility, focus, and balance. It is a seated position primarily used for meditation and is revered for its ability to enhance mental clarity, calmness, and concentration. Although it may seem challenging, especially for beginners, with consistent practice, it can be performed with ease. Below is a step-by-step guide to performing Padmasana effectively: 1. Preparation: Find a Comfortable Space: Before beginning the practice of Padmasana, it is essential to find a quiet, comfortable space free from distractions. Ideally, practice on a yoga mat or a soft surface to provide support for your body. Sit on the mat with your legs extended straight out in front of you, your spine tall, and your hands resting on your thighs. 2. Prepare Your Mind and Body: Sit in a relaxed position with your eyes closed. Take a few moments to center yourself by taking deep, slow breaths. Inhale through your nose, allowing your belly to rise, and exhale through your nose, allowing the belly to fall. This will help you settle into the present moment and prepare your body for the posture. 3. Bend the Right Leg and Position the Foot: To begin the pose, bend your right knee and lift the foot towards the left thigh. Carefully place the sole of your right foot on the upper part of your left thigh, with the heel close to the abdomen and the toes pointing upward. The outer edge of your right foot should rest flat on the left thigh, and the right knee should move gently downward toward the floor. 4. Bend the Left Leg and Position the Foot: Next, bend your left knee and bring your left foot up towards your right thigh, placing the sole of the left foot on the upper part of the right thigh. Ensure that the heel of the left foot is close to the abdomen, with the toes pointing upward. Similarly, the outer edge of the left foot should rest flat on the right thigh, and the left knee should move downward toward the floor. 5. Adjust Your Position: Once both feet are placed on the thighs, ensure that your knees are touching or nearly touching the floor. The alignment should be such that your spine is straight, with the chest open and relaxed. If your knees are significantly raised and you are unable to bring them closer to the floor, it is okay to practice Padmasana with a cushion or blanket placed under your hips to help your knees lower. 6. Place Your Hands on Your Knees: Rest your hands gently on your knees, with your palms facing upward or downward. If you are practicing meditation, you may place your hands in a mudra. The most common mudra for Padmasana is Jnana Mudra, where the tips of the thumb and index finger gently touch while the other fingers are extended, symbolizing knowledge. Alternatively, you can use Dhyana Mudra, where both hands are placed on the knees with the palms facing upward, and the right hand is placed over the left, forming a circle with the thumbs. 7. Maintain a Straight Spine: Ensure that your spine is elongated and straight, with your chest open and shoulders relaxed. Your head should be aligned with your spine, and your gaze can be soft or closed, focusing inward. If you find it difficult to maintain a straight back, you can slightly tilt your pelvis forward by tucking in the tailbone, creating a natural curvature in your lower back. 8. Focus on Your Breathing: Once in position, begin to focus on your breath. Take deep, slow breaths through your nose, allowing the breath to fill your abdomen and then exhale slowly. Inhale deeply, and as you exhale, try to release any tension in your body. This focus on your breath will help you remain calm and grounded during the practice. 9. Relax and Settle Into the Pose: Stay in the pose for as long as you feel comfortable. For beginners, this might be just a few minutes, but over time, with practice, you can extend your time in Padmasana. It is important to avoid forcing the pose; instead, practice patience and allow your body to ease into the position gradually. 10. Coming Out of the Pose: To come out of Padmasana, reverse the process gently. First, uncross your legs and extend them straight out in front of you. Shake out your legs if necessary, as they may feel numb or stiff. Take a few moments to stretch and relax before moving into your next activity. Tips for Beginners: i. Use Props: If you have difficulty sitting in Padmasana due to tight hips or knees, use props like a cushion or yoga block under your hips to help your pelvis tilt forward and make the pose more accessible. ii. Warm-Up: It’s essential to warm up your body, especially the hips and knees, before attempting Padmasana. Perform stretches and poses that open the hips, such as Sukhasana (Easy Pose), Butterfly Pose (Baddha Konasana), or Forward Fold (Paschimottanasana). iii. Practice Gradually: If you are not yet able to sit fully in the pose, practice gradually by sitting in a half-lotus position (Ardha Padmasana) or by using modifications to reduce strain on the knees and ankles. Conclusion: Padmasana is a powerful pose that requires both physical flexibility and mental focus. By following these steps and practicing consistently, you can improve your ability to sit comfortably in the pose and benefit from its physical and meditative advantages. Whether used for meditation, pranayama (breathing exercises), or simply as a way to center the mind and body, Padmasana offers profound benefits for overall well-being.
YOGA