

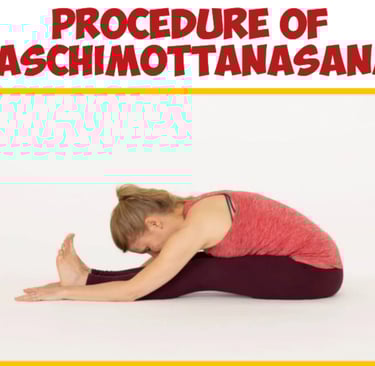
Procedure of Paschimottanasana (Seated Forward Bend Pose)
Paschimottanasana, also known as the Seated Forward Bend Pose, is a deep stretch for the back, legs, and spine. It is often practiced in yoga routines for its numerous physical and mental benefits. Here's a detailed step-by-step guide on how to perform Paschimottanasana effectively: 1. Preparation and Initial Position: Start by sitting on the floor with your legs extended straight out in front of you. Retain your legs together with your toes pointing toward the ceiling and the soles of your feet flat. Sit upright, ensuring that your spine is straight. Your arms should rest by your sides, and your palms should be facing down on the floor. This is the base position, and it is important to focus on aligning the body and establishing a calm, steady breath. Tip: If you find it difficult to sit with a straight spine due to tightness in your hamstrings or lower back, sit on a folded blanket or cushion to raise your hips slightly. This will aid you maintain a neutral spine. 2. Engage the Core and Prepare for the Forward Bend: To enter the pose, begin by engaging your core muscles. Take a deep breath in, lengthen your spine, and lift your chest. Imagine that your torso is rising slightly before you begin to fold forward. This creates length in your spine, which is crucial for protecting your back while performing the forward bend. Tip: Keep your body upright for a moment to lengthen your spine before moving into the forward fold. This initial elongation of the torso will make the stretch more effective and comfortable. 3. Begin the Forward Bend: As you exhale, begin to slowly hinge forward at your hips (not at your waist). Keep your torso long, and avoid rounding your back too much. Reach forward with your hands toward your feet, keeping your arms straight. If possible, try to hold the outer edges of your feet, the big toes, or use a yoga belt around the feet to extend your reach. Tip: It’s essential to bend from the hips and not the lower back. This will ensure a more effective stretch and prevent strain on your spine. 4. Deepening the Stretch: Once you have reached your feet or as far as your flexibility allows, allow your chest and head to move toward your thighs. Aim to keep the back of your neck long, avoiding the temptation to collapse your neck into your chest. Relax the face, jaw, and eyes. If you can reach your feet with ease, gently pull your feet toward you, deepening the stretch. However, if you cannot reach your feet, simply place your hands on your shins or thighs. Ensure that your knees stay straight but not locked—keep a slight bend if necessary to avoid straining the knees. Tip: Focus on keeping the length in the spine even as you fold. If your knees are bent, don’t worry; flexibility will improve over time. 5. Breathing in Paschimottanasana: Throughout the pose, focus on steady, deep breathing. Inhale to maintain length in the spine, and exhale as you deepen the stretch by moving your torso closer to your legs. Your breath should guide the movement—don't force yourself too deep into the stretch. Allow the body to relax and open gradually with each exhalation. Tip: To release any tension in your neck, keep your chin slightly tucked and avoid pulling your head forcefully toward your knees. 6. Holding the Pose: Hold the pose for 30 seconds to 1 minute, or longer if it is comfortable. During this time, continue to breathe deeply and relax into the stretch. With each exhalation, aim to deepen your stretch slightly without pushing your limits. Allow your body to adjust to the stretch and release any unnecessary tension. Tip: If you are a beginner or find it difficult to hold the pose for a long time, you can use a yoga block or cushion under your head to support your neck and avoid strain. 7. Coming Out of the Pose: To come out of Paschimottanasana, inhale and begin to lift your torso slowly. Engage your core muscles and reverse the movement by unfolding your spine, vertebra by vertebra, until you are back in the seated position with your legs extended in front of you. Ensure that you do this slowly and with control to avoid dizziness or strain on your back. 8. After the Pose: After completing the pose, it’s helpful to perform a counter-pose such as a gentle backbend (like Bhujangasana or Cobra Pose) to counterbalance the forward bend and open the chest and spine. Tip: Afterward, sit quietly for a few moments, allowing the body to settle and absorb the benefits of the pose. Precautions and Modifications: i. Neck and Back Issues: If you have any neck or back issues, perform this pose under the guidance of an experienced instructor to ensure that you are doing it safely. Avoid rounding the back excessively. ii. Tight Hamstrings: If your hamstrings are tight and you cannot reach your feet, use a yoga strap around the soles of your feet to assist in the stretch. You can also retain a slight bend in your knees. iii. Pregnancy: Women who are pregnant should avoid deep forward bends, especially in the later stages of pregnancy, and consult a healthcare professional before practicing Paschimottanasana. Conclusion: Paschimottanasana is a beneficial pose for enhancing flexibility, improving posture, and calming the mind. By following the steps above with attention to alignment, breathing, and gradual deepening of the stretch, practitioners can experience its full benefits. Regular practice of Paschimottanasana can lead to better flexibility in the spine, hamstrings, and hips, while also promoting physical relaxation and mental clarity.
YOGA