

Procedure of Supta Bibhaktasana
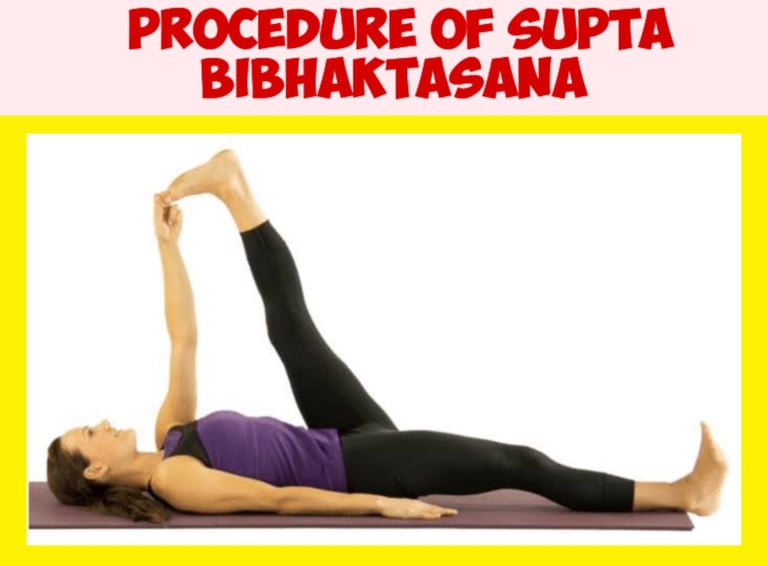
Supta Bibhaktasana, or Reclined Hand-to-Big-Toe Posture, is a yoga posed that includes extending and fortifying the legs, hips, and lower back. It is a profoundly remedial posture that can be done at the starting or conclusion of a yoga session to unwind the body and intellect. Underneath is a step-by-step method to hone Supta Bibhaktasana effectively. 1. Planning for the Pose: Before you start, guarantee that you have a comfortable and level surface to hone on, such as a yoga tangle. The environment ought to be calm and calm to permit you to center on your breath and body. i. Lie Down on Your Back: Begin by lying level on your back, guaranteeing that your body is adjusted and comfortable. Keep your arms loose by your sides, with your palms confronting down. Your feet ought to be together, and your legs ought to be expanded fully. ii. Unwind and Settle Your Breath: Take a few minutes to breathe profoundly, breathing in through your nose and breathing out through your mouth, permitting your body to unwind and discharge any pressure. Center on establishing your body into the tangle, protracting your spine, and planning yourself for the extent. 2. Entering the Pose: The primary activity of Supta Bibhaktasana includes extending one leg whereas keeping the other leg grounded. Here's how to begin: i. Amplify Your Right Leg: Start by amplifying your right leg upward toward the ceilin. Keep your left leg flat on the ground, with the foot flexed and the toes pointing forward. If your hamstring is tight, it is affirmed to twist the knee marginally. Guarantee that your leg is straight but not locked. ii. Utilize Your Right Hand to Hold the Huge Toe: Once your right leg is amplified, utilize your right hand (or both hands if required) to get your huge toe, your lower leg, or the back of your thigh, depending on your adaptability. If you can’t reach your foot, you can utilize a yoga strap around your right foot, holding the closes of the strap with both hands to extend the stretch. iii. Lock in Your Cleared out Leg: Keep your cleared out leg dynamic by squeezing the back of your cleared out thigh into the tangle, guaranteeing that your cleared out knee remains straight. This engagement makes a difference stabilize your pelvis and avoids it from tilting to the side. iv. Adjust Your Body: As you extend the right leg, make beyond any doubt your middle remains adjusted with the floor. Your shoulders ought to stay grounded, and your spine ought to remain long. Maintain a strategic distance from angling your back excessively. v. Extend the Right Leg: Once you have a secure hold on your right leg, tenderly drag it toward your middle to develop the extent. Keep your right leg as straight as conceivable whereas keeping up a delicate extend in the hamstrings, calves, and hips. Your right foot ought to be flexed to lock in the muscles. vi. Hold the Posture: Remain in the posture for 20–30 seconds, or longer if comfortable. Breathe profoundly and equally all through the extent. Center on the sensation of the extent, keeping the breath calm and unfaltering. 3. Deepening the Stretch: If you wish to deepen the stretch, you can make small adjustments to the pose: i. Extend the Leg Further: If you are comfortable, you can extend the right leg further towards your face by gently pulling on the foot or strap. However, avoid overstretching, as the aim is to keep the stretch comfortable and sustainable. ii. Activate the Core: Engage your abdominal muscles slightly to support the lower back and avoid straining the lumbar region. This engagement will help maintain stability while deepening the stretch. iii. Open the Hip (Optional): If desired, you can open the right leg out to the side, while keeping the left leg grounded. This variation stretches the inner thighs and groin. Ensure that both your hips remain on the ground and that you don’t twist the torso. 4. Transitioning to the Other Side: After holding the pose for the desired amount of time on one side, slowly release the right leg and lower it back to the mat. Take a few breaths in a neutral position before transitioning to the other side. i. Repeat on the Left Side: Now, extend your left leg upward toward the ceiling and repeat the same steps, holding the left big toe with your left hand. Keep your right leg grounded and active. Perform the stretch on the left side for the same duration as you did on the right side. 5. Coming Out of the Pose: To exit the pose, gently release the grip on the leg and slowly lower the extended leg back down to the mat. Once both legs are grounded, take a few moments to lie flat and relax in Savasana (Corpse Pose) to absorb the benefits of the stretch. 6. Modifications and Variations: Supta Bibhaktasana can be modified to suit different levels of flexibility and strength. Some modifications include: Using a Yoga Strap: If you cannot reach your foot with your hand, place a yoga strap around the foot and hold the ends with both hands. This will allow you to deepen the stretch without straining. Bending the Knee: If you find it difficult to keep the leg straight, you can keep a slight bend in the knee while still stretching the leg. Support for the Lower Back: If your lower back feels uncomfortable, you can place a folded blanket or block under your pelvis for additional support. Conclusion: Supta Bibhaktasana is an excellent yoga pose for improving flexibility, strengthening the core, and relieving tension in the lower body. With proper alignment, controlled breathing, and mindful stretching, you can experience the full benefits of this pose. Regular practice of Supta Bibhaktasana can lead to improved muscle flexibility, enhanced posture, and greater body awareness.
YOGA