
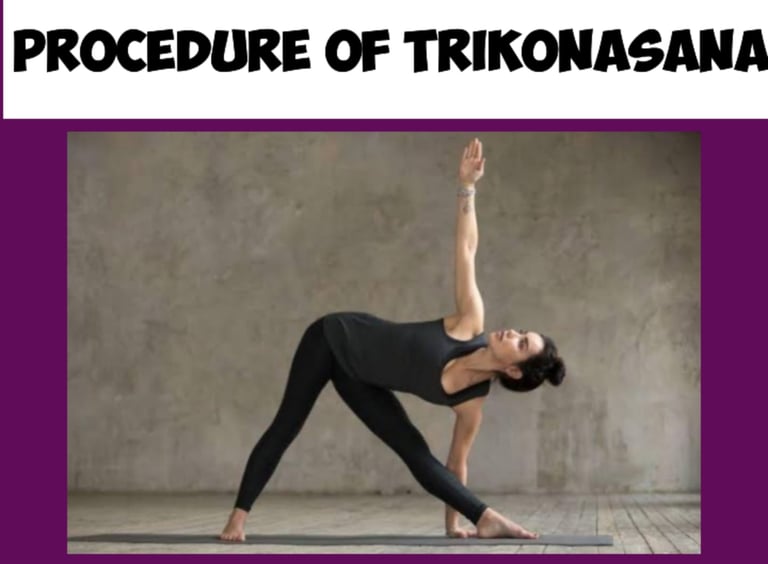
Procedure of Trikonasana (Triangle Pose)
Trikonasana, or Triangle Pose, is a standing yoga posture that offers numerous benefits, such as improving flexibility, strengthening muscles, and promoting overall balance. To perform this pose correctly, it’s important to follow a detailed step-by-step procedure. Below is a comprehensive guide to executing Trikonasana: 1. Preparation: Before beginning, stand in a comfortable position with your feet together. Take a few deep breaths, center your focus, and set the intention to practice with awareness. You may also want to mentally prepare by engaging your core and focusing on grounding through your feet. 2. Step into the Wide Stance: a. Start by standing with your legs wide apart. A common distance is about 3 to 4 feet (or 1 meter), but adjust as needed based on your flexibility and comfort. b. Ensure that your feet are aligned properly: i. Your right foot should be turned outward 90 degrees, while your left foot should be angled slightly inward (around 15 degrees). ii. Both feet should stay firmly planted on the ground. The weight should be equally distributed across both feet. 3. Align the Hips and Shoulders: i. Square your hips forward so that they face the same direction as your right foot. This may take some adjustment, as the tendency is to rotate the hips to the side. ii. Open your chest, and ensure that your shoulders are stacked directly over your hips. 4. Extend Your Arms: i. As you inhale, extend your arms out to the sides at shoulder height, keeping them parallel to the floor. ii. Your palms should be facing down, and the arms should be strong and active, engaging the shoulder blades. iii. Maintain length in the arms and keep them in line with your shoulders. 5. Reach and Extend: i. Begin by reaching your right arm toward the right side as far as you can, keeping both arms extended straight. ii. Your torso should gently tilt to the right, and as you move, make sure you’re not collapsing your upper body forward. iii. Maintain a long, straight line from the tips of your fingers on the right hand to the left hand. 6. Lower Your Right Hand: i. Once you have extended your body as far as you can to the right, slowly lower your right hand to your right ankle, shin, or the floor. Keep your right arm extended and your body lengthened. ii. If your right hand doesn’t reach the floor, it’s perfectly fine to place it on a block or on your leg (shins or ankle), as long as there is no strain. iii. The left arm should now be pointing upward toward the ceiling. Keep both arms active, with your fingers extended toward the sky. 7. Open the Chest: i. Rotate your chest and torso toward the ceiling, ensuring that your ribs and hips are open and facing upward. Your gaze can follow your left hand, or you may choose to look straight ahead, depending on your neck's comfort. ii. Keep the chest open and avoid rounding your back. Engage the core muscles for stability. 8. Hold the Pose: i. Stay in the pose for about 30 seconds to 1 minute, breathing deeply and evenly. Focus on maintaining alignment, stability, and the stretch. ii. Ensure that the legs are strong and active, with the left leg engaged and the right leg straight. 9. Come Out of the Pose: i. To come out of the pose, inhale and press into your feet as you slowly rise back to an upright position. ii. Lower your left arm and return to the standing position with your feet together. iii. Take a moment to center yourself with deep, grounding breaths before transitioning to the opposite side. 10. Repeat on the Other Side: After completing the first side, repeat the pose on the opposite side. Turn your left foot outward 90 degrees, align your hips, and repeat the steps for the left side of your body. Tips for Correct Alignment and Safety: i. Avoid Collapsing the Chest: Keep your chest open and avoid collapsing your upper body forward, as this can strain the lower back. ii. Focus on Lengthening the Spine: Keep your spine long as you move into the pose, and avoid compressing the sides of your torso. iii. Use Props if Needed: If you have difficulty reaching the floor, use yoga blocks or place your hand on your shin or ankle to prevent overstretching. iv. Mind the Knees: Keep your knee caps facing forward (don’t let them hyperextend or rotate inward), and keep both legs strong. Modifications: i. Beginners: If you struggle with flexibility, use a block under your hand or place your hand on your shin, not the floor. ii. Advanced: For more depth, you can place your lower hand on the floor and extend the top arm straight upward, or even challenge your balance by looking at your raised hand. Conclusion: Trikonasana is a powerful pose that builds strength, enhances flexibility, and improves balance. By following these step-by-step instructions and maintaining mindfulness throughout, you can practice Triangle Pose safely and effectively, gaining both physical and mental benefits.
YOGA